Mail
Mail How to split a large MBOX file
If you have been using the same email address for years, the export you get when you finally decide to move is not going to be small. Google Takeout hands you a single file called All mail Including Spam and Trash.mbox, and for an account with some history behind it, that one file often runs to several gigabytes. Other providers do some version of the same thing, so whoever you are leaving, you tend to end up in the same place: one address, one enormous file.
Aster’s manual import accepts files up to 500 MB each, and the cap exists for a good reason. Every message is read and encrypted on your own device before anything is uploaded, and keeping each file to a bounded size keeps that process quick and dependable on any computer. It does mean that a big export needs to be split into smaller files before it can come in, which is what this guide covers.
The whole thing is a one-time job with free, open-source software, it takes under an hour, and your mail never leaves your machine.
One warning before we start. You will find websites offering to split or convert MBOX files for you, and some of them look quite polished. Do not use them. That file contains every email you have ever sent and received, in plain text, and uploading it hands all of it to whoever runs the site. This is a job to do offline or not at all.
Why splitting is safe
An MBOX file has a simpler layout than you might expect: it is just your emails laid end to end in one long file, with each message starting on a line that begins From . There is no index to corrupt and no hidden structure to rebuild, which means a file cut between two messages simply becomes two complete, working mailboxes, and nothing about your mail is damaged along the way.
The only thing that must never happen is a cut landing in the middle of a message, which is exactly what a generic file splitter would do, since those cut at fixed byte counts with no idea of what they are cutting through. That is why we use a mail program for this instead. It always cuts on the boundary between messages, because it never sees your archive as anything other than mail.
What you need
Two pieces of software, both free and both open source:
- Thunderbird, Mozilla’s desktop mail app, which runs on Windows, Mac, and Linux.
- ImportExportTools NG, an add-on that moves mailbox files in and out of it. Its source code is on GitHub.
You will not be creating an account or connecting to anything, and no mail is sent or received at any point. Thunderbird simply acts as a local editor for mailbox files.
Step 1: Install both
Download and install Thunderbird, and if it opens an account setup screen on first launch, close that tab, because you will not need an account for any of this.
Then click the menu button in the top right corner, choose Add-ons and Themes, and search for ImportExportTools NG. Click Add to Thunderbird and confirm, and the add-on is ready to use.
Step 2: Import your export
If your export came from Google Takeout, unzip it first, and you will find the mailbox file inside under Takeout > Mail.
In the pane on the left side of Thunderbird, right-click Local Folders and choose ImportExportTools NG > Import mbox Files > Individual mbox Files, then select your file.
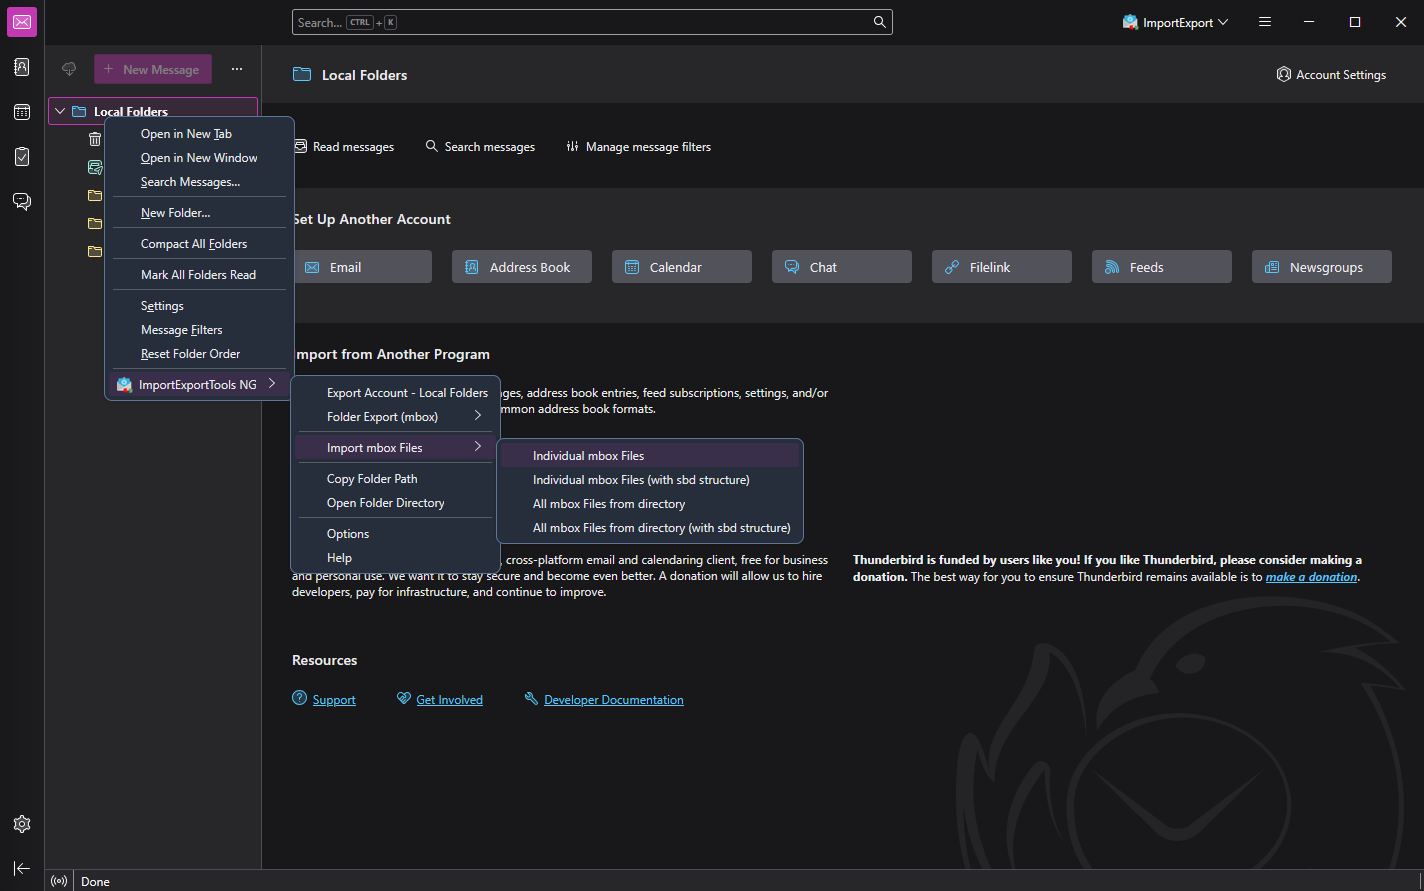
Thunderbird copies the file in and indexes it, which takes a few minutes for a file this size, so give it time to finish. When it is done, your export appears as a normal folder under Local Folders, with every message in it readable:
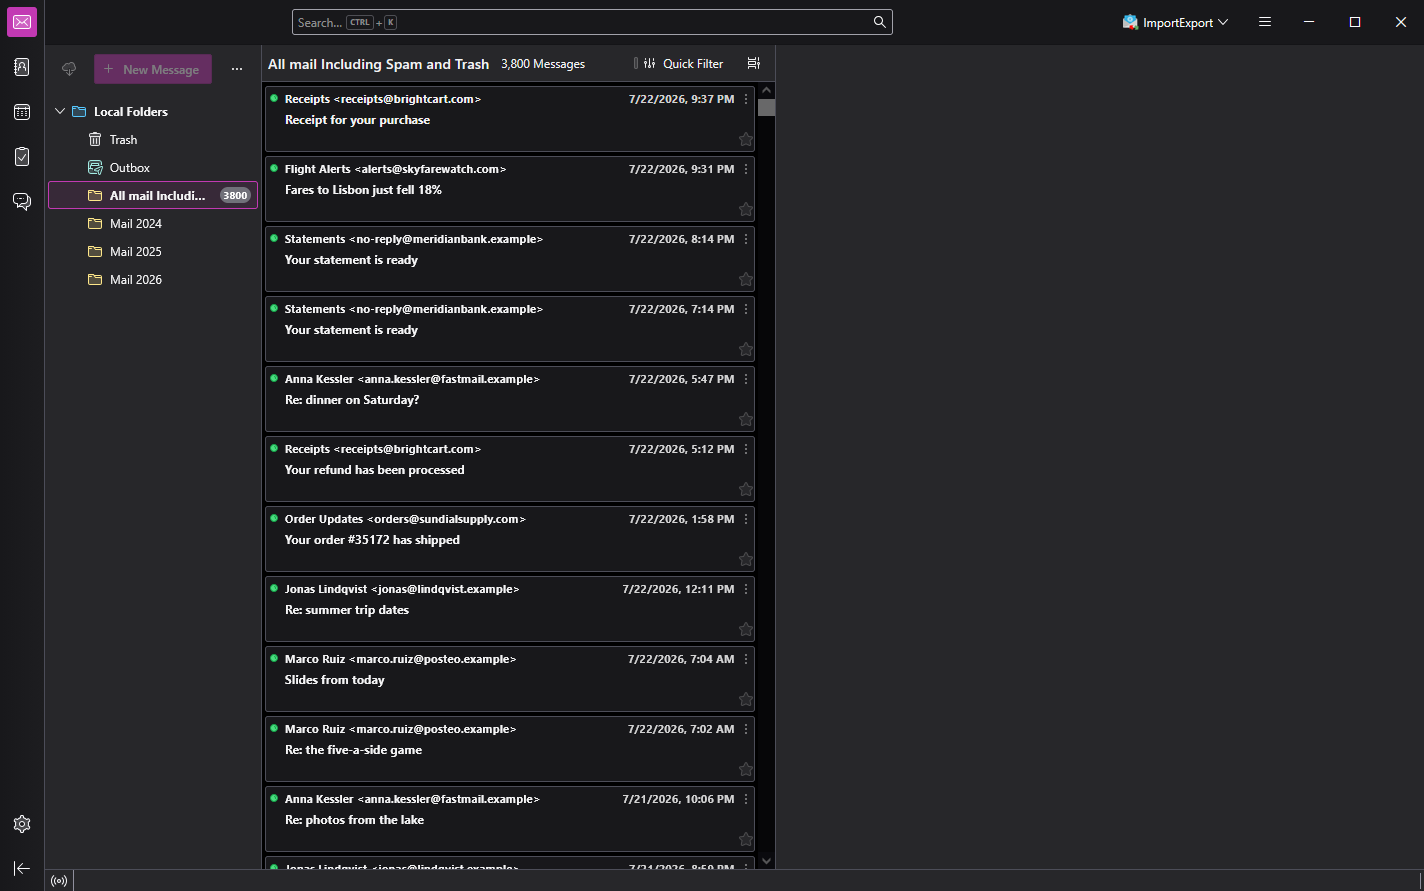
It is worth taking a moment to look through your mail while you are here, because years of it in one place has a way of showing you what you no longer need, and anything you delete now, old spam, newsletters you never read, notifications from services that no longer exist, simply stays behind.
Step 3: Make a folder for each year
Right-click Local Folders again, choose New Folder, and name it Mail 2024, then repeat for every year your archive covers.
Years make convenient pieces for two reasons: a single year of personal mail almost always comes in under 500 MB, and the files you end up with have names that will still mean something when you find them on a backup drive years from now.
Step 4: Sort the mail into the year folders
Open the imported folder. The message list is already sorted by date, so each year forms one continuous block, and selecting a year is just a matter of marking where it starts and ends: click the first message of the year, scroll down to its last, then hold Shift and click that one, and everything between the two is selected. Now right-click the selection and choose Move To > Local Folders > Mail 2024.
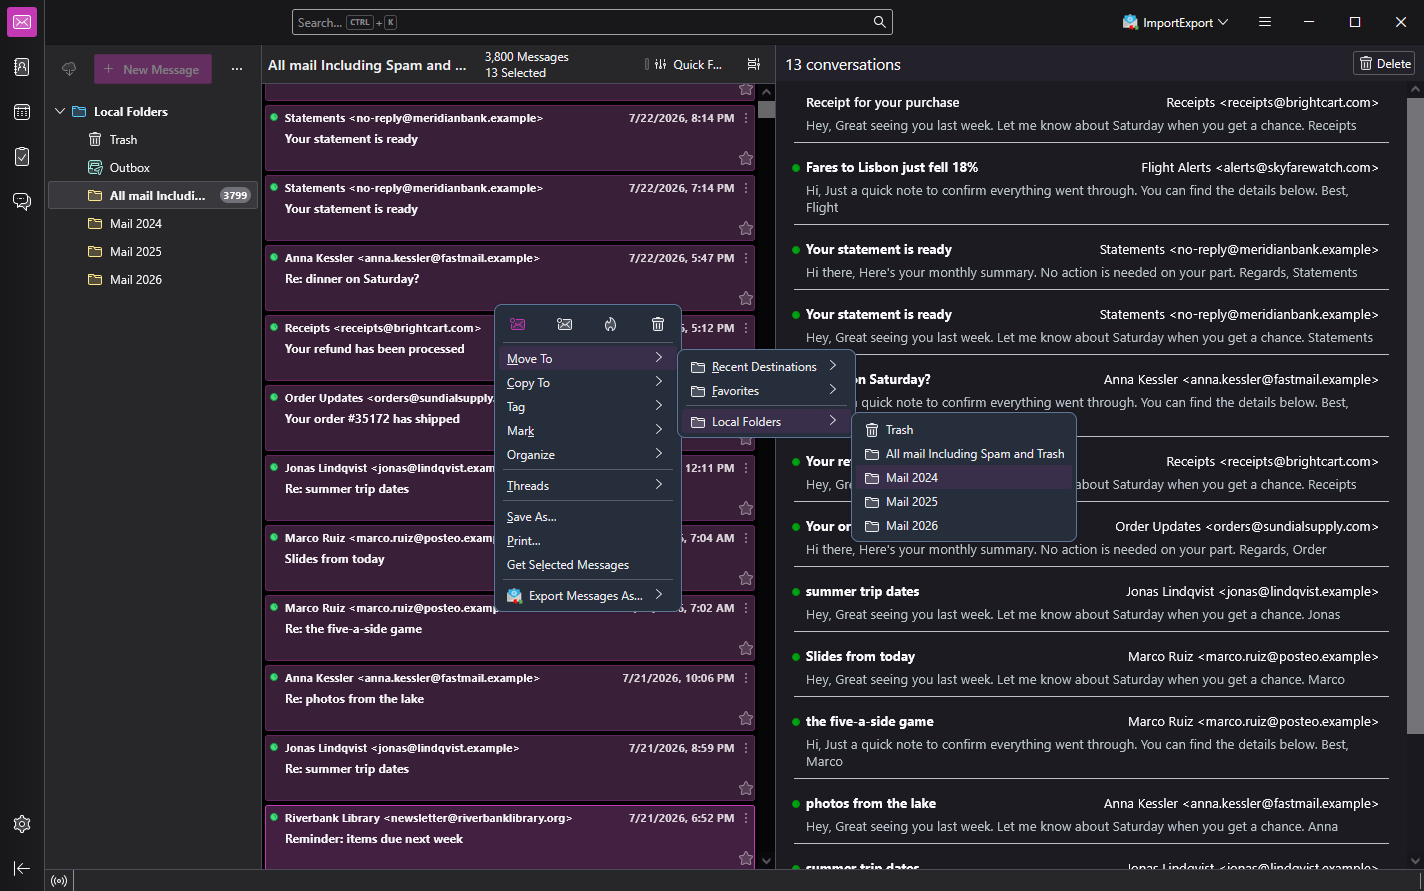
Work through the years the same way. It only takes a few minutes, and if you lose your place, the message counts next to the folders in the left pane show you exactly what has moved so far.
Step 5: Export each year as its own file
Right-click a year folder, choose ImportExportTools NG > Folder Export (mbox) > As mbox File, and pick where to save it.
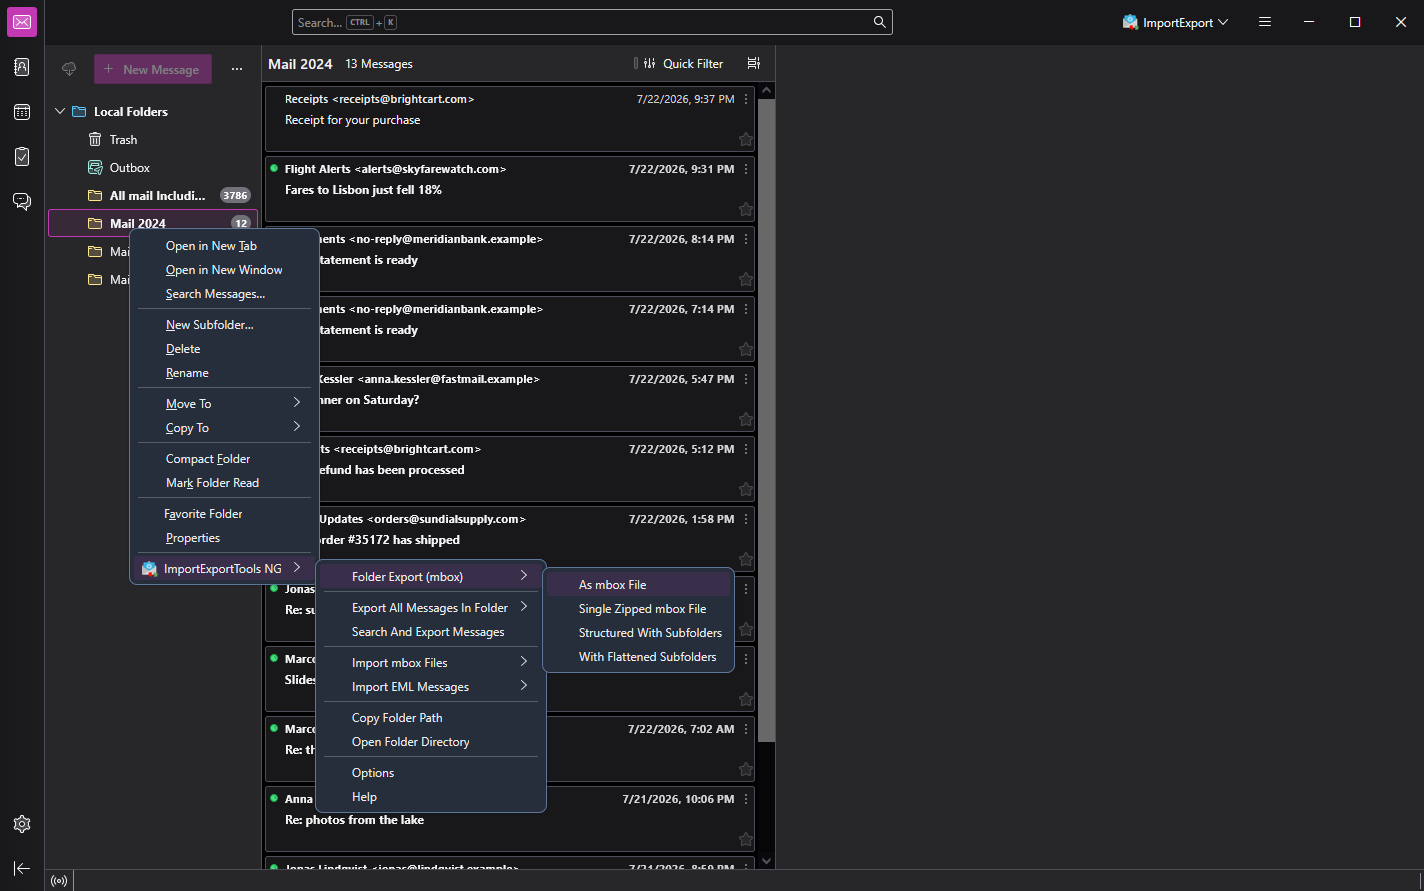
The exported file is named after the folder and comes without a file extension, so rename it to add one, turning Mail 2024 into Mail 2024.mbox. The file itself is already a complete, standalone mailbox and needs no other changes.
When you have exported everything, check the file sizes. If one busy year came out over 500 MB, split that year’s folder into two halves, January through June and July through December, and export each half on its own.
Step 6: Import into Aster
In Aster, open Settings > Import and click Manual, then drag the first file into the window or pick it with Browse Files.
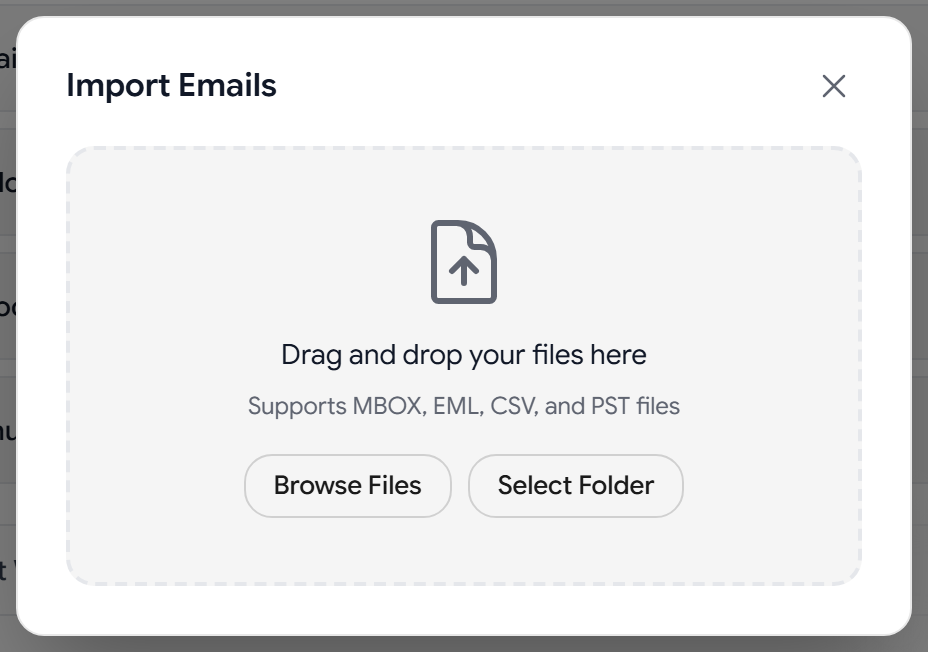
Aster reads the file on your device, encrypts each message right there, and uploads only the encrypted copies, and when one file reports complete, you start the next. The full details are in our import guide, but the short version is that this flow is built to forgive mistakes:
- Order does not matter. Each file is a complete mailbox on its own, and messages land with their original dates.
- Duplicates are skipped. If you lose track and upload the same file twice, Aster recognizes the messages it already has.
- Threads reconnect. A conversation that ended up split across two files is put back together once both are in.
- Keep the tab open. Let each file finish before starting the next one.
There are two limits worth knowing about. A single email over 50 MB is skipped and noted in the import summary, so nothing ever disappears without a trace, and imported mail counts toward your plan’s storage, so if an import reaches your limit, it stops and tells you rather than quietly dropping the rest.
Done
That is the whole process. A big archive becomes a handful of clean files, each under the limit, and your mail arrives in Aster already encrypted from your own device, in an inbox that belongs to you.

Founder and CEO of Aster Privacy.